TIG Welding Tips
TIG Welding
Positions for Different Types of Joints
Reading Electric, a leading supplier of electro-mechanical equipment, services, and problem solver for Industrial and Commercial customers for over 50 years provides technical information to the Region’s Residential, Commercial and Industrial Community. This Bulletin provides information on tips to improve your TIG Welding in Butt, Lap Joint, T-Joint and Corner Joint. Always read and follow the safety precautions and operational instructions in your owner’s manual.
How do I position my TIG torch for different types of joints?
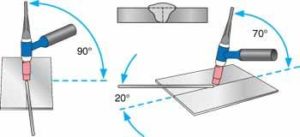 Butt Weld
When welding a butt joint, center the weld pool on the adjoining edges. When finishing, decrease the heat (amperage) to aid in filling the crater.
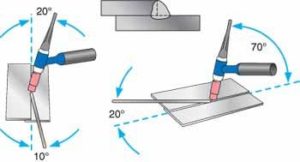 Lap Joint Weld
For a lap weld, form the weld pool so that the edge of the overlapping piece and the flat surface of the second piece flow together. Since the edge will melt faster, dip the filler rod next to the edge and make sure you are using enough filler metal to complete the joint.
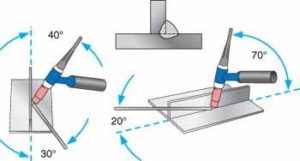 T-Joint Weld
When welding a T-joint, the edge and the flat surface are to be joined together, and the edge will melt faster. Angle the torch to direct more heat to the flat surface and extend the electrode beyond the cup.
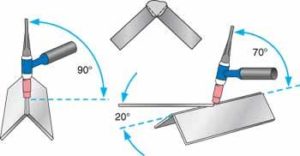 Corner Weld
For a corner joint, both edges of the adjoining pieces should be melted and the weld pool should be kept on the joint centerline. A convex bead is necessary for this joint, so a sufficient amount of filler metal is needed.
(Information contributed by Miller Electric)
Remember: We offer 24 / 7 Repair Service.
Reading Electric is an Authorized Factory Repair Center for Miller, Lincoln, Esab, and Hobart Welding Equipment. For assistance and additional information on Welding Equipment and Services, Contact John Eckert at Reading Electric.
Phone: 610-929-5777 | Fax: 610-929-1670
Recent Comments